Avast Virus Chest No Restore Option | How to Restore
Avast has the propensity to erase your data if it thinks of any file as a threat. These files might be crucial, and deleting them could get you into trouble. If you are failed to restore them from the virus chest, you may need to use a data recovery program.
Undoubtedly, safeguarding your computer from advanced malware is essential to have a sound system. And you can ensure this by utilizing powerful antivirus software. When it comes to powerful antivirus, Avast is one of the top antivirus programs available.
This article is about how to access the Avast virus chest and retrieve deleted files, as well as how to restore a file even if restoring from the virus chest fails.
Why is Avast Detecting Common Files as Threat?
Avast protects your computer from virus attacks, but it also has certain downsides. In some common cases, Avast gets blamed for accidentally erasing files while running, including installed executable programs, photographs, and documents. The reason is probably the existing inappropriate algorithm of the software.
But before restoring any file, you must confirm that the removed files are not malignant in nature. Otherwise recovering a real virus can result in more data loss.
To be cautious, stop restoring the deleted file if you are unsure and can move on without it. However, if the file is crucial, restore it.
What to Do When Avast Virus Chest Not Showing the Restore Option?
It is not a common scenario, to be honest. But as we all know, there is no software that is completely out of any issue. So, there can be some sort of difficulties that your Avast program is facing and as a result, it is not showing the restore option, or in other words, it is not letting you restore the detected files from the chest.
In this case, there are a few things that you can do that are pretty simple and you don’t have to face any hassle.
Tip 1: Update Your Avast Program Online
With an internet connection, you can easily update your Avast program. All you need to do is open the system tray from the taskbar and right-click on the Avast icon. Then expand the Update section and select Program.
If the program doesn’t start checking for updates automatically, get into the program’s Settings, click on Update in the General tab, and go for CHECK FOR UPDATES.
Tip 2: Reinstall the Avast Program
This is another effective way to resolve this problem. Simply open your preferred browser, search for the latest Avast Antivirus program (you can get it from their official website), download it, and finally install it. As simple as that!
Frequently Asked Questions (FAQs)
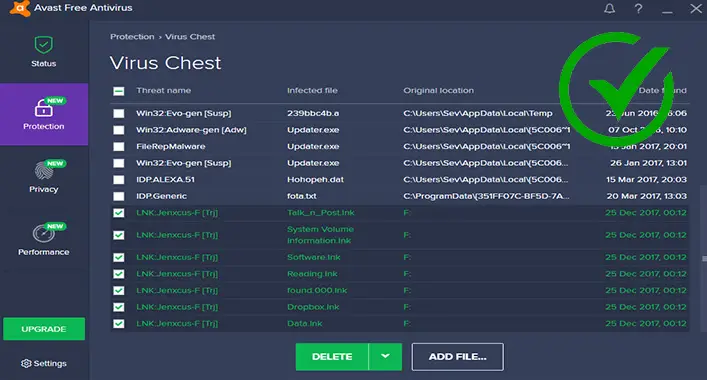
How to restore files from Avast Virus Chest?
This is a quite simple task. To do so –
- First, launch the Avast application.
- Go to the Protection tab from the left sidebar.
- Choose Virus Chest.
- Now, choose the files that you need to restore.
- Click on the 3 dots to see more options and select Restore.
How to recover deleted files from quarantine?
Try this way to recover the deleted files –
- Open Start menu.
- Go to Settings.
- Click on Update & Security.
- Go for Windows Security.
- Select Virus & threat protection.
- Go to Protection history.
Here, you will find all the quarantined files. Choose the items that you need and restore them.
How may I recover any files after a virus scan?
If there is a file that you need to recover after it gets deleted through a virus scan, follow these easy steps –
- Open the antivirus program that you have used to scan.
- Select the Menu option.
- Go for the Virus Chest or Quarantine or any other specific tab that contains the quarantined files.
- Select the file(s) you want and recover it by clicking Restore.
Conclusion
As it is confirmed that Avast frequently deletes some common files by mistake as a potential threat, the files need to get restored and also you need to prevent Avast from deleting them again. This article may provide the information that you need to do so. To get more secure, try to back your important files into another safe storage.
![[Fix] Malwarebytes Not Opening (100% Working)](https://cyberselves.org/wp-content/uploads/2022/05/Malwarebytes-Not-Opening.jpg)
![[Explained] Is Driver Easy Malware? | Is It Trustable?](https://cyberselves.org/wp-content/uploads/2022/03/Driver-Easy-Malware.jpg)