[Fixed] Malwarebytes is not Removing Malware (100% Working)
Malwarebytes is a popular application that is used to detect and remove malware. Some users have reported that their version of Malwarebytes is not removing malware. The application failed to detect malware for some reason. Here, in this article, we’ll discuss the reasons and fixations for this issue.
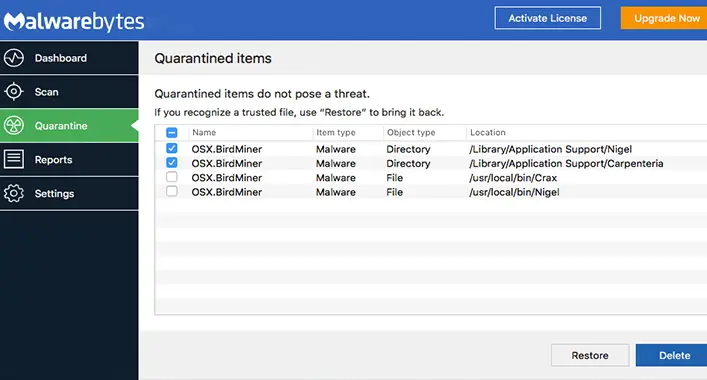
Reasons of not Removing Malware Issue
Some reasons are mostly responsible for causing the issue on the Malwarebytes application. If you can detect those reasons, it will be easy to fix the issue. Those below-described reasons are mostly responsible for causing the issue on the Malwarebytes application;
1. Outdated versions of Malwarebytes may fail to detect and remove the malware. If so, updating the Malwarebytes application could resolve the issue.
2. Disabled detection settings of Potential Unwanted Programs (PUPs) on the Malwarebytes application settings could be responsible to encounter the issue. In this case, enabling the PUPs detection settings will fix the issue.
3. Sometimes the system files get corrupted and for this reason, the Malwarebytes application fails to detect and remove the malware. If this condition is applicable, repairing the system through the Malwarebytes support tools will help you to resolve the issue.
How to Fix – ‘Malwarebytes is not Removing Malware’ Issue
It is easy to fix the issue if you follow some methods. These below-described methods are the most efficient way to troubleshoot the malware removal issue of the Malwarebytes applications;
1. Updating Malwarebytes Application
If the issue is caused by the outdated version of the Malwarebytes application, you need to update the Malwarebytes application. You can follow these below-described steps to update the Malwarebytes application;
Step-1
Open the Malwarebytes application and click on the Settings Icon from the top-right corner of the application homepage.
Step-2
Thereafter, go to the General tab of the Settings options and click on the Check for updates. It will automatically check for potential updates and install it. Turn on the Automatic Update toggle to auto-update the application.
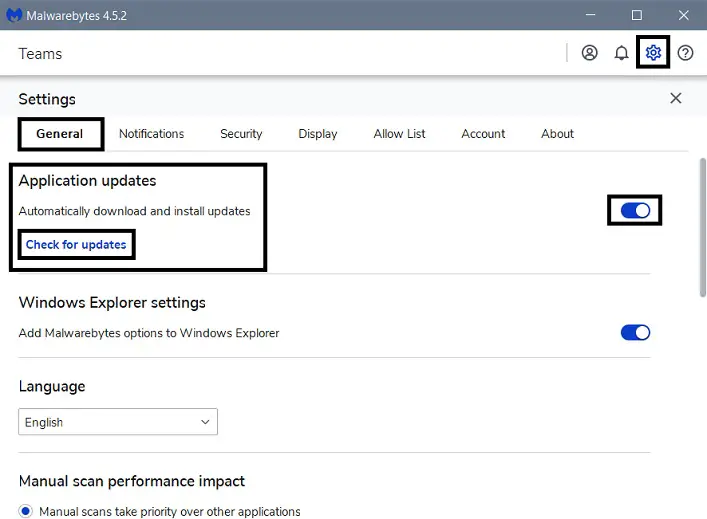
After completing the downloading and installation process of the Malwarebytes application, check if the issue is resolved now. If the malware issue stills exist, enable PUPs detection from the application settings.
2. Enabling the PUPs Detection Settings
As said before, disabled PUPs detection could trigger this type of issue in the Malwarebytes application. Check the settings of the Malwarebytes application to see if the PUPs detection is enabled or not. You need to follow these below-described steps to check and enable the PUPs detection on the Malwarebytes application;
Step-1
Open the Malwarebytes application and navigate through Settings > Security Settings. Under action for Potentially unwanted items, change the Settings for Detect Potentially Unwanted Programs (PUPs) and Detect Potentially Unwanted Modifications (PUMs) to always.
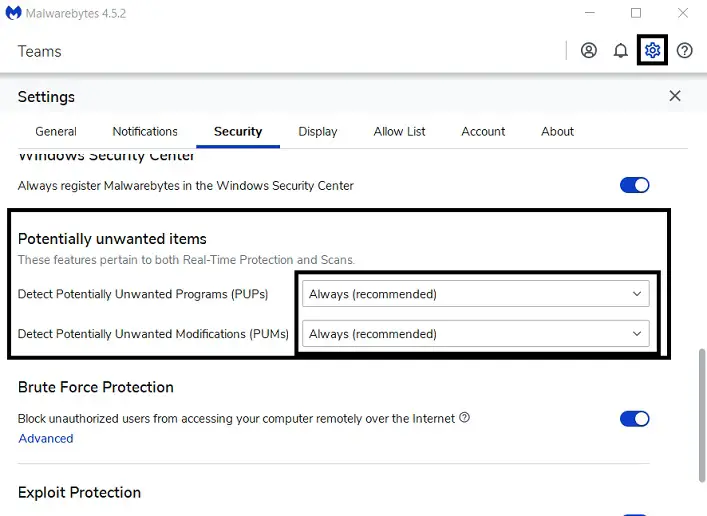
Step-2
Afterward, run Quick Scans with the Malwarebytes applications and check if the Malwarebytes application started to detect and remove malware.
Now, try to scan malware through the Malwarebytes application to check if the issue still exists, if the issue has not been resolved yet repair the system through the Malwarebytes support tool.
3. Repairing System Through the Malwarebytes Support Tools
If the issue is triggered for the corrupted system files, repairing the system will help you to resolve the issue. To repair the system through the Malwarebytes support tool, you need to follow these steps described below;
Step-1
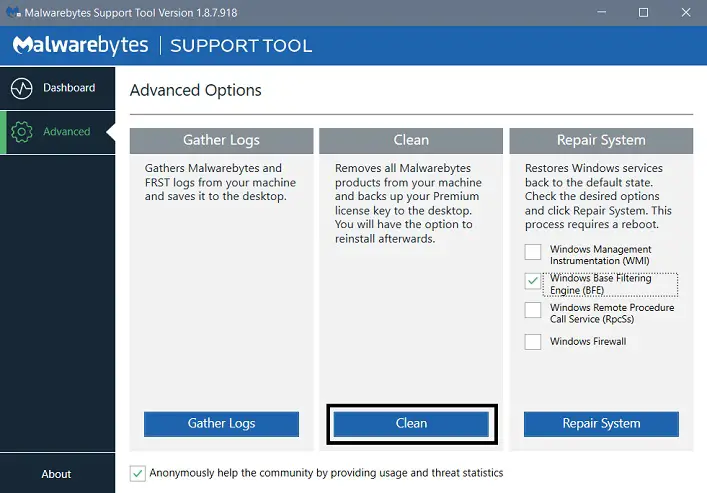
Open the Malwarebytes support tool. If you don’t have an installed version of the Malwarebytes support tool. Go to the Advanced tab of the Malwarebytes support tool, tick the Windows Base Filtering Engine (BFE) before clicking on the Repair System.
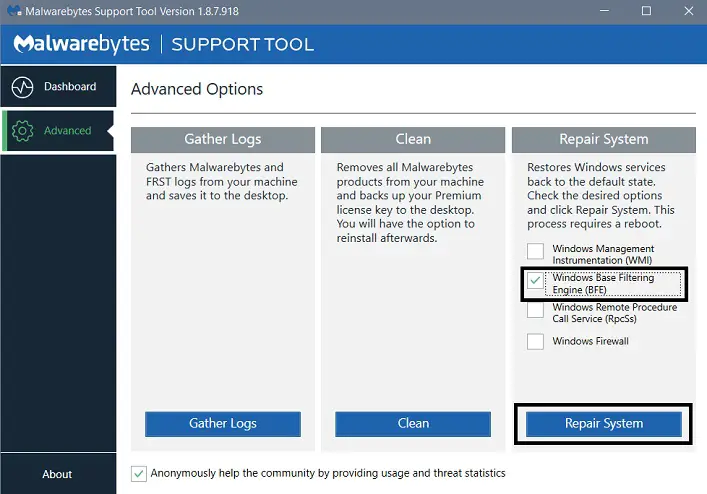
Step-2
It will take a few minutes to complete the repairing process. Also, it may require some restart of your device while running the process.
Now, check if Malwarebytes started to detect the malware now, if the issue still exists now, reinstall the Malwarebytes application through the Support tool to resolve the issue.
4. Reinstalling the Malwarebytes Application
When all the above-described fail to fix the issue, reinstalling the application is the last stand for you to fix the issue. Before reinstalling the application, make sure that all your works are saved in the background. You can follow these steps to reinstall the Malwarebytes application through the Malwarebytes Support Tool;
Step-1
Open the Malwarebytes Support Tool and go to the Advanced Tab. Click on the Clean button from the Advanced Options, then click on Yes from the newly appeared Malwarebytes Cleanup pop-up.
Step-2
Afterward, another pop-up will appear, click OK on the pop-up to restart your device. Once the device restarts, click on Yes from the pop-up to start the Post Reboot Cleanup. Thereafter, another pop-up will appear which says Reinstall Malwarebytes for Windows, click Yes to start the reinstallation process.
Step-3
Whenever the installation process is completed, reconfigure the application and start scanning to check if the issue has been resolved now.
[Note: Make Sure That All Your Work Is Saved in The Background Before Starting the Reinstallation Process]
If the issue still exists, submit your Malwarebytes application log to the Malwarebytes support team through the Support tool.
Does Malwarebytes Remove All Malware?
The Malwarebytes anti-malware application is capable of removing all types of Malwares, Worms, Trojans, Rootkits, Rogues, Dialers, Spyware, Adware, and all types of programs that can cause a potential threat to a device. Though Malwarebytes cannot fix the changes made by malware on system settings, yet it can repair the system. Also, Malwarebytes can detect PUPs and PUMs which may be a reason for potential damage to the device system.
What to do if Malwarebytes finds Threats?
When the Malwarebytes scan detects potential threats to your device, you need to tick the item boxes you want to neutralize before clicking on Quarantine Selected. Malwarebytes will ask for further action for the unchecked item, with a pop-up appearing on the screen. You can find three options on the pop-up, Ignore Once, Ignore Always, and Cancel. If you select Ignore Once, Malwarebytes will not remove the unchecked items this time, but it will delete the unchecked items after a further malware scan. Whilst selecting Ignore always option will never let Malwarebytes delete the unchecked files. But if you select cancel, it will terminate the whole Quarantine process for this time. Malwarebytes require the restart of the device to remove the threats. To remove the threats, you need to click on the Yes button from the confirmation pop-ups. Your device will perform a restart when Malwarebytes remove all the threats to the device.
Is There Something Better than Malwarebytes?
You already know that Malwarebytes is one of the best third-party anti-malware tools available on the market. Most of the best anti-malware tools offer nearly the same types of services (although they have a small variety of provided services). Anti-malware tools like Avast, AVG, Norton, Kaspersky, Bitdefender, Webroot, McAfee offer the same service as Malwarebytes (all these have a little variety of types of services).
How do I Completely Remove Malware?
To completely remove malware from your device, you need to follow some steps, these steps will efficiently remove the Malware from your device. You should follow these below-described steps to completely remove the malware from your device;
Step-1
Save all your unfinished work and disconnect all types of internet connections from the device.
Step-2
Boot the device into safe mode and remove all the temporary files of the device (Temp folder of Windows OS, Cache folder of Mac)
Step-3
Run a Malware scanner through the Firewall or third-party anti-malware application and clear all the browser history, cookies, and cache.
This is the most efficient way to remove malware from your device permanently. Make sure to save all the unfinished work in the background before starting the malware removing procedure.
Frequently Asked Questions (FAQs)
What is the Common Symptom of Malware Infection?
Some common symptoms are noticed on most of the Malware infected devices, which are so common that anyone can detect them. The common symptoms of Malware infection are described below;
1. The device’s performance will fall down with some strange programs running in the background.
2. Unusual programs and plug-ins installed on the device which are not installed by the user.
3. Strange pop-ups with unusual, explicit, and annoying content. This content could also be noticed outside the web browser.
4. Existence of unauthorized and unnecessary files on the device.
What is the Difference Between Anti-Virus and Anti-Malware?
The differences between the antivirus and anti-malware remain on the core purpose of them. The antivirus application provides device protection from viruses and other malicious threats, whilst the anti-malware application prevents the device from getting infected by malware and other malicious threats. Also, anti-malware applications can remove malware from an infected device.
What are the Criteria for Malware Removal Tool?
A perfect anti-malware tool has some characteristics in common. These are the main criteria for an effective malware removal tool. The criteria for an effective malware removal tool are given below;
1. Included protection from all kinds and types of malware and malware threats.
2. Low-impact on the performance of system and range of features or bundled tools.
3. Usability and customer support service.
Final Words
Here you are now, hope that your Malwarebytes application is now working properly and one of the above-described methods has helped you to resolve the Malwarebytes not removing malware issue. It is recommended to boot the device into safe mode before starting the malware-removing process. That’s all for today, see you again with a new topic, have a great day.

![[Explained] Can a PS3 Get a Virus?](https://cyberselves.org/wp-content/uploads/2023/04/Can-a-PS3-Get-a-Virus.webp)


